This manual will walk you through the first steps of getting started with your wholesale storefront.
- Customer registration form
- Customer registration to wholesale storefront
- Customer login
- Connect to Cropster’s Order to Roast
Initial setup
Updating logo
- To update your site log, log into your store and go to the Dashboard, please then go to Appearance > Customize:
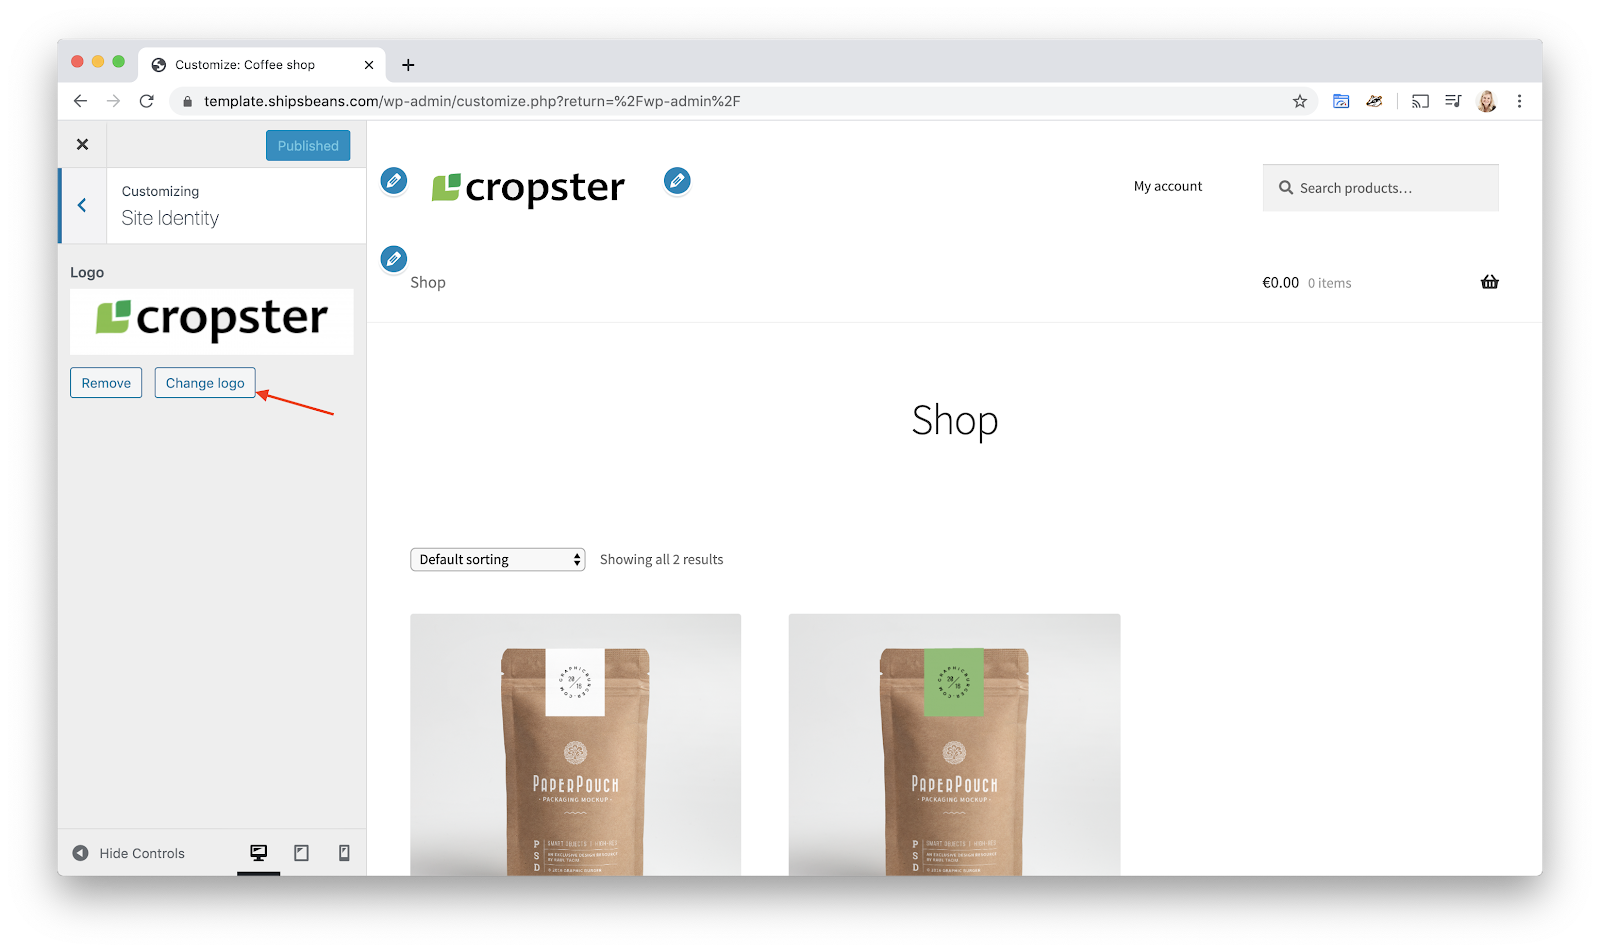
- You will be led to an editor where you can customize specific parts of the page. If you are not familiar with WordPress, we strongly recommend to keep the default settings and only change the logo. To do this, go to Site Identity:
- Click on Change logo and upload your logo:
- To apply the changes, click Publish at the top-left side of the page.


Updating terms
When you operate a webshop you need to offer a Privacy policy and Terms and Conditions for your service. Both of these documents are linked at the checkout and in the footer of the site.
Note: A customer who places an order needs to check a box to confirm that they have read your Terms and Conditions, that’s why it’s so important to take some time to review and update them.
We do not provide Terms and Conditions nor Privacy Policies with your site as they depend on your business and the customer’s location. You need to do this yourself.
Cropster has no liability in this e-commerce scenario between you (the seller) and your customer.
We have created template pages for these two, please fill them in accordingly.
- To update a page, please go to your Dashboard and click on Pages:
- Hover over Terms and Conditions with your mouse, and click on Edit:
- Update the content of the page. When you are ready, make sure to click the Update button in the top-right corner of the page.


Note: Terms and Conditions are different for each country. You can find a WooCommerce example here, but it needs to be adapted for each country.
After this, do the same with the Privacy Policy page. When you edit the Privacy Policy page on WooCommerce you can find a link on top of the page that offers guidelines for writing those:

Adding products
During the onboarding process, your Cropster representative will assist you with the importation of your products.
Note: If you need to add any new products, please visit the following article to learn more: How to add a new product (wholesale storefront)
Enabling payment methods
In each B2B shop that is set up with us, the payment option “Invoice” is enabled (it is called Invoice gateway). This payment option allows your wholesale customers to place an order to the agreed pricing terms without having to pay upfront.
If you want to be able to charge for your orders from your web store via other payment providers aside from Invoicing, or you need to enable payment methods retroactively after the onboarding process, you need to enable them via the Payments section in your account.
Note: The following payment providers are part of the onboarding process and can be simply enabled: Paypal, Stripe, Square.
To learn more about how to set up a payment method, click the following article: How to set up a new payment provider
Setting up a shipping zone
Make sure you review your shipping setup before you start selling. You can define flat rate-shipping fees per region, but first you must start by adding a shipment zone; we recommend to add a shipment method that is geographically close to your region.
- Go to WooCommerce > Settings > Shipping tab > Add shipping zone button.
- Enter a Zone name. This identifies a zone for you. E.g. Local zone – California
- Define the Zone regions.
Note: This is the correct geographic region for this zone as used by your customer when they create orders (E.g. California, United States). Orders from this region will be provided with the shipment policies you set for this region. - Click the Add shipment method button.
- Click on the drop-down menu for the Add shipping method pop-up window, then select between the following shipment policies:
- Free shipping
- Flat rate
- Local pickup

Note: To learn about setting up shipment methods, visit our article How to set up shipment methods, and/or the WooCommerce resources for shipment to learn more.
Making a test order
If you have followed the steps above, finish your setup with a test order to make sure everything is working. You can use Invoice gateway as the payment option on the checkout, or you can create a product that is free (0 €/$) that you can then process via checkout.
If everything goes well, you should see your first order showing up under WooCommerce > Orders:

Wholesale roles
Note: By default one wholesale group, called Wholesale customers, is set up on the initial onboarding of your account; this wholesale role cannot be deleted.
The Wholesale customers role is used automatically for any new customer registration entered via your wholesale registration form. If you want to assign a customer a different wholesale role, you can do this after the approval of your new customer’s registration.
A wholesale role can be used to specify prices, discounts, payment methods or shipping methods for a specific group of customers (i.e. Wholesale customers, Silver members, etc.).
You can create different groups in order to classify different users differently. Please refer to the instructions below to create a group and learn how to assign a user to a particular group.
Setting up wholesale roles
- From your Dashboard, go to WooCommerce > Wholesale roles.
- Type in the Role name, then add a Role key and description (optional), then press Add new wholesale role when you are ready to create the group.
- The group is now displayed on the right-hand side of the page.
- To assign a wholesale role to an existing customer, go to Users.
- Find the user in question, and click the Edit button.
- Scroll down to the Role drop-down menu, then select the wholesale role you want to assign to the user (i.e. Gold members, Silver members).
- Scroll down and click the Update user button when you are ready.

Restricting a product to a wholesale role
You can also restrict individual product visibility to certain roles only. This may be a helpful tool if you have multiple Wholesale groups set up.
- From your Dashboard, go to Products.
- Click the Edit button corresponding to the product you would like to restrict.
- On the right-hand side, click on the Restrict to wholesale roles drop-down menu.
- Select the wholesale role you would like to restrict this product to.
- Click on the Update button.

Restricting variations to specific wholesale roles
If you have a Variable product where you just need to make one variation available to a particular Wholesale role, this can be done by following the instructions below:
- From your Dashboard, go to Products.
- Click the Edit button corresponding to the Variable product you would like to restrict.
- Scroll down to the Product data section.
- Click on Variations from the left-hand side of the Product data section.
- Hover over the product variation in question, then click on it.
- Scroll to the Wholesale exclusive variation section, then click on the field.
- Type, or select the wholesale role(s) the variation is to be restricted to.
- Click the Save changes button.


Wholesale pricing (introduction)
Currently we support the following pricing strategies:
- (Recommended) Discounts in % for a group of customers (wholesale roles) for all products.
- Discounts in % for one specific customer for all products.
- Discounts in % for a group of customer (wholesale roles) for a product category.
- Total new price for a group of customers on an individual product.
Note: To learn more about how to set up these pricing strategies from your storefront account: Setting up wholesale prices & discounts on your storefront
Customer registration form
In order to have access to your wholesale store, your customers will need to register first. Cropster provides you with a pre-configured registration form where some fields are required*, while others are optional. The fields available below are from the default registration form, and are ordered as such:
- First name*
- Last Name*
- Phone*
- Email address*
- Company name
- Address
- Terms & conditions
* = fields required
Optional: Customizing customer registration
Your storefront has pre-configured registration and email formats, but you have the ability to:
Note: If you need any help with the editing of your customer registration form, or email formats, please reach out to support.cropster.com.
If you would like to add a custom field to your registration form, please let us know.
Customer registration to wholesale storefront
Your shop can be accessed through your specific shop domain* name. When a customer first accesses your wholesale storefront, they will need to register, and be approved, prior to having access to your products.
* = your Getbeans storefront’s domain name cannot be freely chosen or changed (e.g. it always is <yourstorename>.getbeans.com). You cannot use a custom domain name.
- Customers access your storefront through your unique Getbeans domain.
- The user will need to click on Register, or Register here in order to prompt the registration page.
- Once complete, the user must submit the information by clicking the Register button.
- Upon submission, the new user will receive a confirmation email.


An unapproved user will not be able to login until they are approved by the web store’s administrator.

Approving a customer’s registration
In order to manage customers and new registrations, please follow the instructions below:
- From your Dashboard, go to Users. Note: Use the filters (i.e. All, Unapproved, Wholesale customer, etc.) above the table to focus on particular users.
- Hover over the user in question, then click Approve if you want to allow the customer access to your wholesale storefront.
Note: If you have accidentally rejected a customer, you may go to the All or Rejected filters, then hover over the customer in question and click Approve. - Once approved, the new user will receive a confirmation email.
Note: After the user’s approval, they will be able to log in using the provided credentials.

Customer login
Your new customer has now been approved and is now ready to log in and make a purchase! From the storefront your customers can:
- View the total cost of the order and the total number of items (1)
- Add/Remove products from the shopping cart (2)
- Search and filter for specific products (3)
- Access My account page (4)
- Select (available) product Variations (5)
Note: To learn more about product variations, you can read the following manual from WooCommerce
- Visit the View cart page or go to Checkout page directly

Accessing “My account” page
Once your customer is able to log in after being approved, they can access their own My account page. Through “My account” your customers can:
- View recent orders and reorder products
Note: Visit the following article to learn more about how your customers can reorder products: How to reorder products from an earlier order via “My account” (buyer’s perspective) - Manage shipping and billing addresses
- Edit your password and/or account details
Checkout
Through the Checkout page, the user can confirm:
- Billing details (1)
- Review their order and total (2)
- Select a payment method (3) (i.e Invoice) from the payment methods available.
- After the customer clicks the Place order button, an email confirming the order will be sent.


Connect Cropster’s Order to Roast
During the onboarding process of your Ecommerce account, your Cropster representative will assist you in performing the integration between your web store, and our online platform C-sar.
Note: To learn more about managing orders via the Orders module, please visit the following article: Using the Orders module
Synchronizing an order
After an order has been placed, the order must be synced in order for it to display from
To sync your unfulfilled/pending orders, click the Synchronize button from the Orders section.
Note: If you have issues synchronizing an order from your web store to Cropster, please visit the following article to learn more: Shopify/Woocommerce orders not syncing
Congratulations! You have set up your wholesale storefront!
Thanks for being a Cropster customer! If you have feedback, questions, or concerns, please feel free to reach out by submitting a support ticket directly from support.cropster.com.
We design and make alterations to our software based on user feedback, so we look forward to seeing what you have to say!